Teaching Upwind Sail Trim - Another Approach

The most difficult maneuver to learn for Junior is the small circle, but the most difficult general skill to learn is upwind sail trim. I have tried a number of ways to teach this, but until recently I haven't found a really good one. Like everything in teaching sailing (or anything else), different techniques work for different students, but there seems to be a really wide range here of what works for whom. For teaching sail trim, each of the methods I've tried have worked well for some, but not many students. After enough time on the helm, they'll figure it out, but I've been looking for something to make it click faster.
I've even written a blog on it:
https://www.cal-sailing.org/blogfrontpage/recent-blog-posts/entry/teaching-upwind-sail-trim
But not everyone learns by reading about it.
What I'm trying now looks promising, though, so I'll go over it here.
Start teaching this when the student is using both the tiller and the sheet, and they are comfortable handling both with some coaching on sail trim.
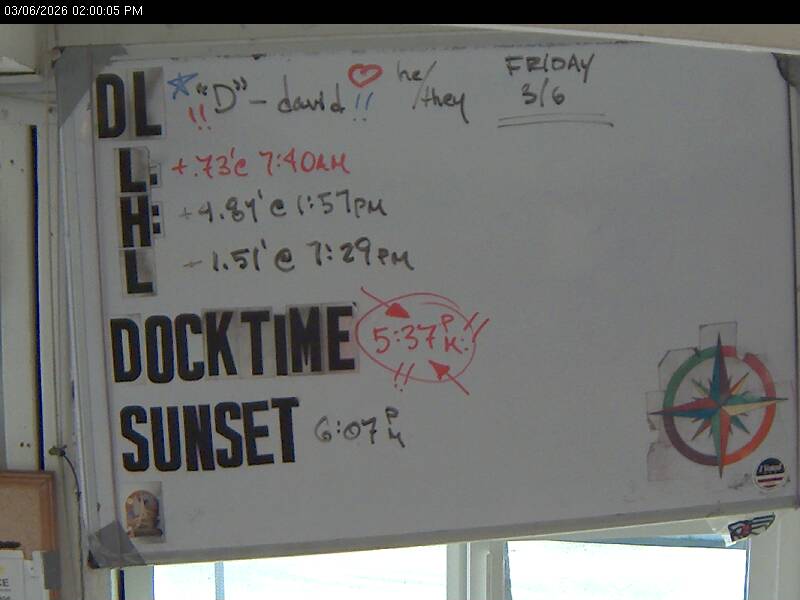
I start with a tiny bit of theory. I'm not big on theory, as I don't think knowing it helps you sail better, but there's one key concept that has many ramifications - the sail is a wing when you're going upwind. It works like the wing of an airplane, except that the lift is horizontal rather than vertical. For sail trim, you need to know that a wing only works in a small range of angles to the wind. Go outside of that (like trying to get a plane to climb at too high an angle), and the wing stops working. So your goal in sail trim is to keep the sail within that small range of angles.
You have two controls to do it – the mainsheet and the tiller. The mainsheet controls the angle of the sail to the boat, and the tiller controls the angle of the boat to the wind. In most cases, you can use either or both to get the sail angle right.
You can see this in these diagrams.
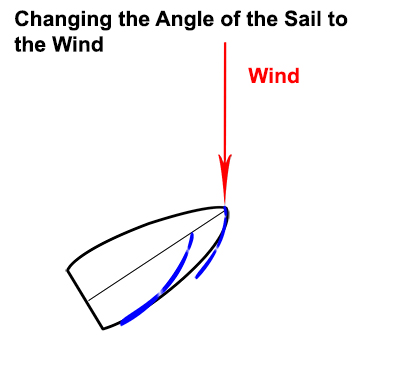
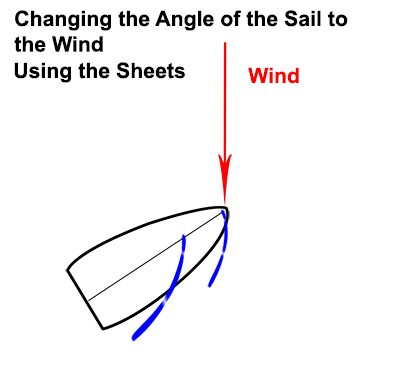
Note that in the second and third diagram, the sail is at the same angle to the wind, but we got there in a different way - easing the sheet in the second on and turning the boat upwind in the thrid.
The next step is to get the feel of a "happy boat", that is a boat with a main trimmed correctly. You'll need somewhat more than 5 knots of wind for this to work, preferably closer to 10. I coach the student to get the main trimmed correctly and ask what they feel in the boat. They will usually say that it's moving fast, which is correct, but they might also notice that the boat wants to lean, to heel. I tell them that this is the sign that the boat is happy. If the lean goes away, either the wind has gone away (unlikely but possible) or the sail is not at the correct angle to the wind. Some students think that heel is bad, so here you can correct this. It's a litle contradictory. You're using your weight to try to keep the boat flat or relatively so, but if the boat does not want to heel, it's not powered.
After that, with the boat happy, I have them turn slowly upwind leaving the mainsheet cleated, and I ask them to tell me when they feel the boat is no longer happy, when the lean goes away. Then turn downwind to make it happy again. Do this a few times, and then have them look at the sail when the boat is not happy. It will be luffing. That is the sign that you are too high into the wind.
Next we do the same thing going downwind. Get the boat happy and turn downwind until it becomes unhappy. Do this a few times, then look at the sail when the boat is unhappy and see that it is not luffing. This is the sign that you are too far downwind for where the sail is set.
That's pretty much it. Then we sail, focusing on knowing whether the boat is happy, and on keeping the boat happy using the two controls, mainsheet and tiller. I let them play with it, as I want them to feel when the trim is correct and when it is not. I might coach a bit, but I prefer not to. I try to limit my coaching to asking "Is the boat happy? OK, make it happy."
This approach seems to work with a larger number of students than anything else I've tried. And I think coming away with a feel for when the boat is trimmed correctly is a great result, much better than looking at telltales and seeing them streaming.
And it leads easily into controlling the boat in puffs and lulls without losing too much speed:
Try it out, and let us all know here how it worked for you.
When you subscribe to the blog, we will send you an e-mail when there are new updates on the site so you wouldn't miss them.
Comments 1
John, this is very well written and describes what I like students as well as fellow sailors to understand. It’s the happy boat or the boat in its groove where it starts to heel a bit more and accelerates. You can take the boat in and out of this state in a controlled manner just like you describe it assuming steady conditions or even in changing conditions but with more adjustments needed.
I demonstrate that to students. Also when I see an over trimmed main I will not just tell the student to let out the main until it luffs and then tighten it until it stops luffing which in itself is the right thing to do; hoping to give the student a better understanding I tell the student that the main is too far in and that we will now let it out inch by inch and observe if we start to go faster. If we get the boat to start to heel and accelerate I say now the boat is happy and explain the air flow basics.
I explain how the sail splits the air and that air then needs to flow along both sides of the sail. It only does that if the sails are set correctly and one then gets that happy boat experience.
I believe that helps the student know to look for the right sail trim….of course only lots of practice then makes a master. And with an instructor it will go a lot quicker.
I picked this up during a sail with Alan Champion while tacking our way out through the marina channel. Alan made the statement that the boat is in its groove right when it started to heel a bit more and accelerated. I have used that since then to explain why we trim sails.
Note: Some students become intimidated by that heeling initially so I explain to them that that is exactly what the boat wants.